We have been
BUSY…have had a crowded job site. CONCRETE, CARPENTRY, ROOF
INSULATION/MEMBRANE, PLUMBING and HVAC contractors are efficiently on the
jobsite at the same time. There will be an enclosed, watertight workspace in
place in the next day or so.
The CONCRETE
contractor has completed the ADA compliant interior ramp as well as the concrete
privacy wall that isolates dodge avenue from our transitional parking area.
The
CARPENTERS continue making good progress completing their pre-roofing
insulation/membrane and skylight prep responsibilities. Interior framing and exterior
opening infill continues with window installation nearing completion.
The
ROOF INSULATION/MEMBRANE contractor immediately followed (the CARPENTERS) installing
4.5” polyiso rigid insulation (r28) over the existing modified bitumen roofing
system. This was followed by a 60 mil TPO “white roof” membrane. During the “bidding
phase” of the project we cut several test holes. Our investigation revealed
that the previous roofing system had been “torn off” last time, thus we felt
that re-roofing over that system would be a positive. The existing 5” perlite
rigid insulation (r16) was also a positive and the existing membrane would
expedite progress on the building interior. Most of the mechanical trades are
“through the roof” with the remainder once they are on the job full force. It’s
easier/faster for the ROOF INSULATION/MEMBRANE contractor not to have lots of
penetrations to work around and to flash them later, thus we get a better final
result.
NEXT…CARPENTERS
continue with interior mezzanine framing. PLUMBING begins with above ground
waste, vent and water piping. The ELECTRICAL
contractor gets into the exisitng electrical service modifications and service
panel feeds.
HAVE
A GREAT HOLIDAY SEASON… enjoy the photos and video
andy
CONCRETE: miguel is prepping for slab infill at abandoned loading dock.
CONCRETE: starting to grade for ADA compliant ramp.
CONCRETE:ramp is complete, ready for exterior opening infill and interior framing.
CARPENTRY: existing exterior skylights have been removed, that material will be re-cycled. renovation is NOT cost/energy effective. kris and peter prep each existing opening for a new 4' x 8' insulating skylight and infill the balance for new insulation/roof membrane. each of these units will have (3) 4' x 8' skylights.
CARPENTRY: skylight opening modifications continue. everything is tarped to keep water infiltration to a minimum. raised skylight curb to follow.
CARPENTRY:new skylight curb in progress by Przmek.
CARPENTRY: curb has been framed and skylight installed. stud space will be insulated and drywalled later.
CARPENTRY: we use the lift as an elevator to get the skylights to the roof, then they are moved, gasketed and installed.
CARPENTRY: bathroom and mechanical rooms are being "roofed". notice the the 10' breakthroughon the left. this allows for tenant expansion to additional units.
ROOF INSULATION/MEMBRANE: materials are hoisted to the roof.
ROOF INSULATION/MEMBRANE: lots of "STUFF".
ROOF INSULATION/MEMBRANE: Analino and Ricardo on the job.4.5" of polyiso rigid insulation is fastened to the existing roof deck. we only install what can be covered with the 60 mil TPO membrane that day. a special "contact" adhesive is rolled on to the polyiso and back of the membrane. it takes 10-15 minutes for the adhesive to cure, then the membrane is "flopped over" and rolled into place. repeat.
ROOF INSULATION/MEMBRANE: membrane is being installed, hand rolling to follow.
ROOF INSULATION/MEMBRANE: membrane is being installed.
ROOF INSULATION/MEMBRANE: notice the roller in the center of the photo. most of the bubbles between the membrane/insulation are removed during rolling with the balance disappearing on their own in a few days.
ROOF INSULATION/MEMBRANE:a new roll of 60 mil TPO + andy's shadow.
ROOF INSULATION/MEMBRANE: it was more cost effective and "safer" to insulate/membrane the masonry parapet wall on the left than to tuckpoint the masonry leaving a non-waterproofed section.
ROOF INSULATION/MEMBRANE: vertical TPO sheet counter-flashes the horizontal.Intersection is heat welded.
ROOF INSULATION/MEMBRANE: DONE with this section.
CONCRETE:due to it's height, the privacy wall was poured in two sections with the joint occurring below grade.
CONCRETE: first height of wall is nearly framed
CONCRETE:a section of brick was removed to achieve the necessaryaesthetic facing Dodge avenue.
CONCRETE: second section of wall is ready to be poured. the small piece of 45 degree angled wood (camfer) nailed into the form creates anedge that's less susceptible to breaking.
CONCRETE:forms stripped, concrete is curing. it takes about a month to attain it's maximum strength.
CARPENTRY: entry vestibules in progress, so are the unit demising walls. this section of the project has no second floor lofts...the existing ceiling height was too low.
CARPENTRY: Tomek is working on the entry vestibule to units 6 & 7.
CARPENTRY: units 4 & 5 interior framing are in process. this section of the project has enough volume for second level lofts.
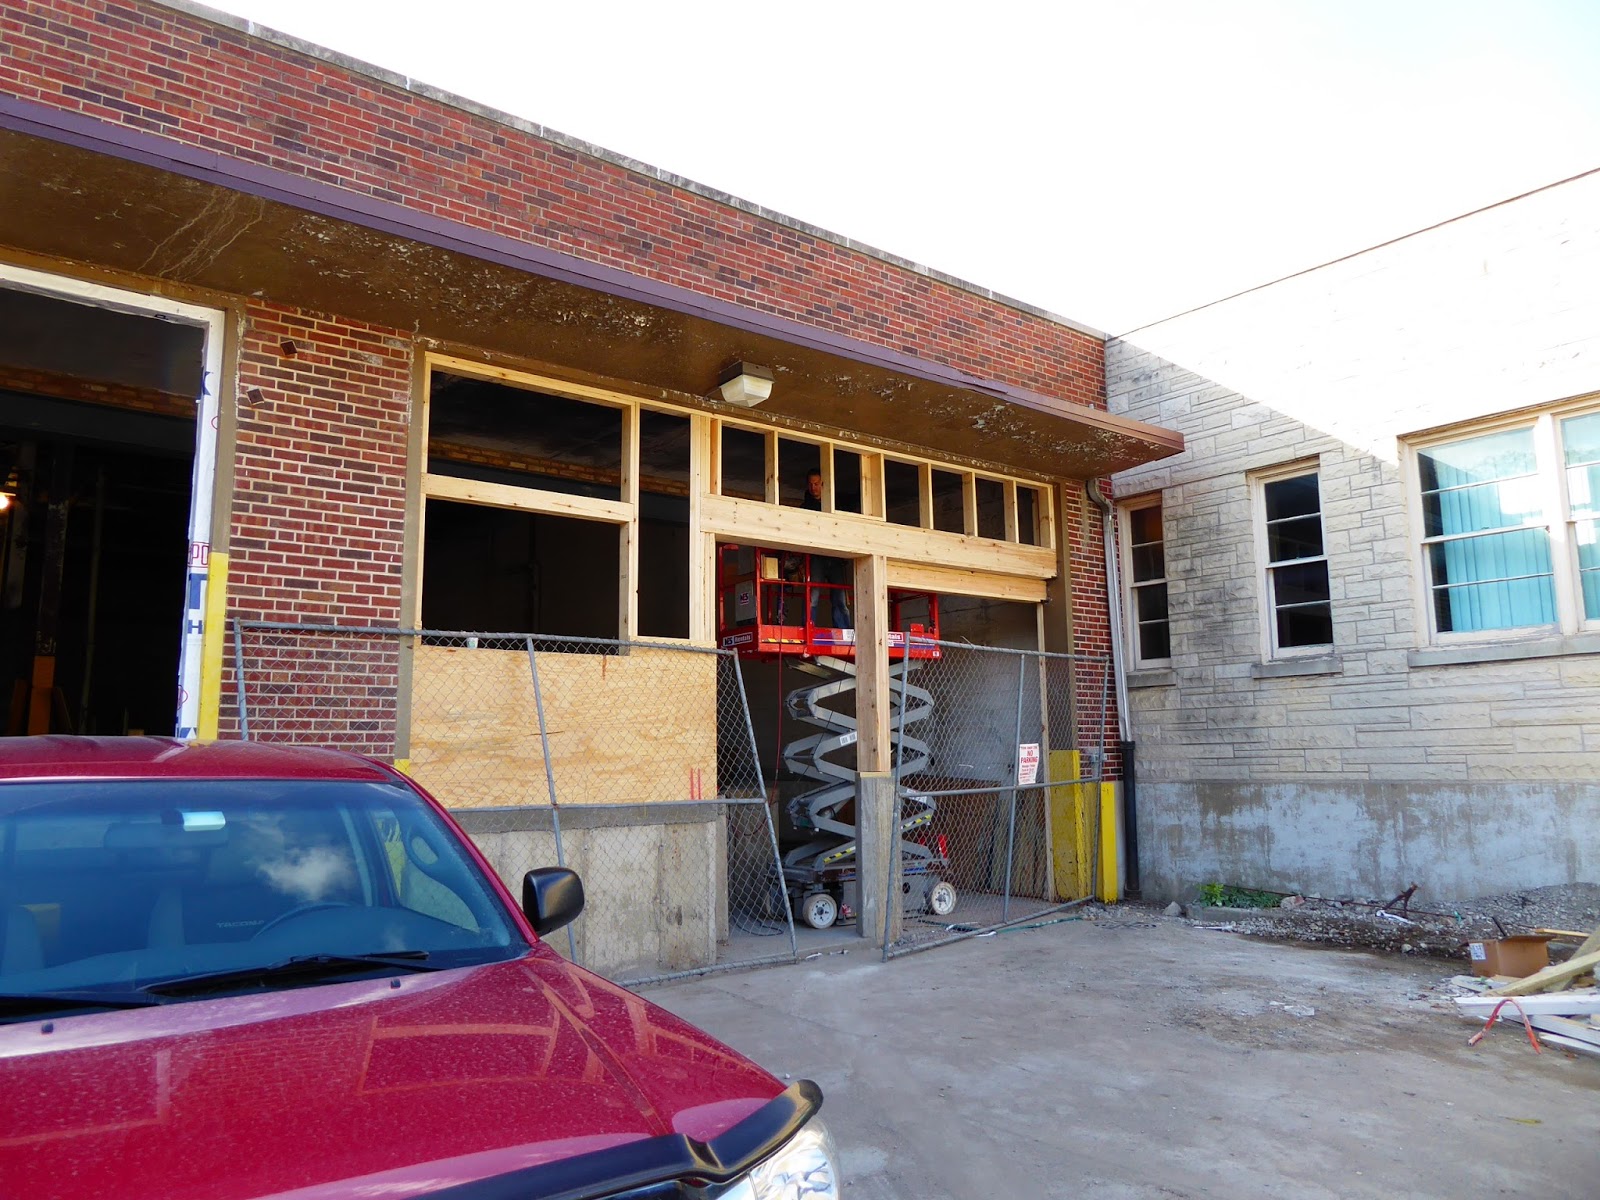
CARPENTRY: Kris and Matt are laying out the service corridor exterior entries. there is one 8' overhead door and a 3'-0" man door.
CARPENTRY: Kris and Peter are framing the service corridor exterior openings.
CARPENTRY: service corridor is taking shape.
CARPENTRY: Przmek and Kris are installing windows in unit 2.
CARPENTRY: the 22' adjustable ladders are great, we have 2.
CARPENTRY:installing the 3/4" plywood deck at the mechanical room in unit 8.
CARPENTRY: framing the mechanical room in unit 7.
CARPENTRY: topping off the exterior entry off Dodge avenue at units 6 & 7.
CARPENTRY: Tomek is working on the "breakthrough" between units 8 & 9. each unit has one or two ways of linking to the adjacent unit. this allows us to accommodate a growing tenant.
CARPENTRY: more mechanical room and bathroom "tops".
Ready to go…the CONCRETE,
MASONRY, STRUCTURAL STEEL and under slab PLUMBING have sufficiently progressed
where interior and pre-roofing CARPENTRY has started (more on that next time).
Again, the space is large enough so all of the trades listed above could work
efficiently at the same time. Matt seamlessly moves the “pieces”.
NEXT…CARPENTRY continues with
interior framing and ROOFING begins. Our focus is to get closed and waterproof
before winter.
Enjoy the pics (andy)
CONCRETE: dodge avenue unit entry framed and ready for concrete. each entry serves 2 units.
CONCRETE: footings poured, walls framed and ready for concrete.
CONCRETE: pouring dodge avenue unit entry walls. pumping the concrete makes this much easier/faster.
CONCRETE: forms have been stripped. exterior stair is next.
CONCRETE: piers for steel column/beam system are ready to go. the columns are set 4" below the top of the existing concrete. an additional 4" of concrete is poured after steel installation.
CONCRETE: the pump is being used at the other end of the project, thus this pour is done "old school".
CONCRETE: this unit entry is ready for back fill. note sand mound in the background. work has started on the next unit entry to the north.
PLUMBING: underground waste lines being installed at the "high end" of the gravity system.
PLUMBING: ziggyis starting a 4" waste riser.
PLUMBING: 2x6 jigs were installed by the carpenters prior to starting any plumbing work. all waste and vent risers were located at that time. The jigs are removed after backfilling the excavation prior to starting the concrete slab work. ziggy and david did a nice job.
PLUMBING: the risers for the bathrooms and utility rooms in these 2 units have been completed. once the partitions have been framed by the carpenters, the risers are cut to the proper height during the remainder of the waste/vent piping work.
PLUMBING: this section is ready for backfill. the open pipe ends will be taped closed shortly to keep debris out of the system.
MASONRY: shoring will be "past tense" soon. prior to that is structural steel installation, masonry infill and waiting a week for the mortar and concrete to cure.
MASONRY: "needle beam" detail in shoring system.
MASONRY: the steel columns/beams get installed between the scaffolding. the bricks will be used to infill the area above the beams and the holes from the needle beams.
STRUCTURAL STEEL: columns are ready to go. again, the recessed piers are infilled with concrete post steel erection.
STRUCTURAL STEEL: beams are good to go. the lengths are short due to the tightness of the working conditions. this was considered in the architectural design with column spacing.
STRUCTURAL STEEL: the crane was used to move the beams to the interior.
STRUCTURAL STEEL: columns and beams have been installed. lots of hand work. as with our other projects, the steel will be exposed in the finished product.
STRUCTURAL STEEL: ready for masonry infill above the beams.
STRUCTURAL STEEL: details.
MASONRY: the area above the beam is being infilled.
MASONRY: the area above the beam is being infilled.
CONCRETE: wood jigs have been removed, slab in plumbing area being installed.
CONCRETE: this section of slab has been competed. slab is now being poured at dodge avenue side of project.
MASONRY: mortar and concrete has cured, OK to remove shoring.
MASONRY: shoring being removed, nothing as collapsed which is a GOOD thing.
SAW-CUTTING: concrete wall will be removed for the new concrete entry stairs.
SAW-CUTTING: guide rails for saw have been attached. as an FYI, the blade diameter is 32" .
SAW-CUTTING: the saw and cutting area are water cooled during this process.
SAW-CUTTING: set up is about 30 minutes with cutting taking about 3-5 minutes per side.
CONCRETE: stairs being poured. units 4-9 have entries off of dodge avenue.
CONCRETE: each stair serves 2 units.
CONCRETE: slab infill is being done at the other end of the building.
CONCRETE: ready for carpenters.
CONCRETE: ready for carpenters.
CARPENTERS: partitions have been "chalked" out, 2x6 treated wood plates are being installed in the bath/utility area in units8 and 9.
CARPENTRY: interior partitions will take a while...